
DIY: Not Your Children's Fairy Lantern
A step-by-step guide to an adult friendly craft!
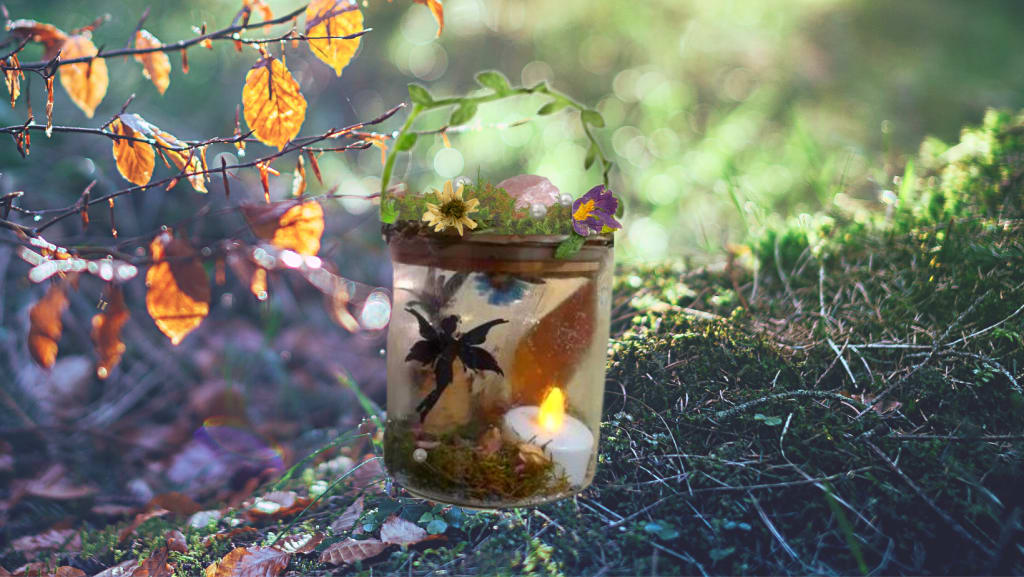
Fairy lanterns have been trending in the craft world for a little while now. Kids of all ages are getting swept away in this fun fairy-tale styled DIY project. However, why should the kids have all the fun? For this reason, I decided to take this enchanted project to the next level with a more advanced and aesthetically pleasing approach.
Whether you are looking for a solo project or a fun way to spend a night with friends, this fun DIY craft will definitely bring a little magic into your life!
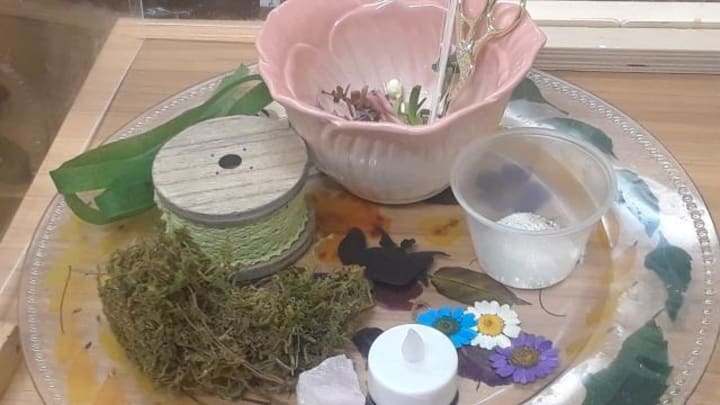
What you will need:
- Shimmer glue (Recommendation: Mod Podge Sparkle)
- Sponge Brush
- Wide neck glass jar, preferably with a bamboo lid (most dollar stores stock these)
- Rose Quartz Crystal (This can be purchased from a new age shop or online)
- Glue gun with clear glue sticks (Walmart or some Dollar stores)
- Pearls or pearl beads (Michaels or Dollar store)
- Pressed flowers (instruction link) or high-quality faux flowers (Michaels or other local craft store)
- Natural jute leaf twine and miniature tree stump (Amazon or Dollar store)
- Dried: Moss, lavender & rose petals (These items can be purchased from a local apothecary or some craft stores)
- LED battery operated tea light (no real burning candles for safety reasons)
- Fairy Silhouette (Draw: thick black cardstock, white pencil crayon & scissors) Alternative options: print or purchase a fairy silhouette.
DIY Fairy Lantern Instructions:
- Glue some moss to the top of the lid, you can use as little or as much as you desire. Gently press the moss into the glue so that it is securely in place. Please be careful not to burn your fingers! Next, apply a thin layer of shimmer glue on top of the moss with a sponge brush. Once it dries the moss will become firm. Preserved/dried moss can be quite messy; therefore, I highly recommend placing a tablecloth down which you can shake off outside or into a trash bin at the end.
- Glue a piece of leaf twine around the lip of the jar. Make sure that it is glued high enough that it doesn't obstruct the jar from being able to open and close smoothly)
- Glue a piece of the leaf twine under the lid on both sides, to create a handle, so that you can hang your lantern to display it. To figure out your desired length, make a loop to see how long you would like your handle to be before gluing it in place.
- Glue the rose quartz into the moss on the center of the lid (pull off any strings of glue) Use two fingers to firmly press it into the glue, you will need to use a generous amount of glue if your crystal is heavy to keep it securely in place. Please note that if you are using a low heat glue gun you will need to move quickly to make sure that the glue doesn't dry before you have it properly positioned.
- Glue some pearls, dried flowers and any of the other craft supplies of your choosing to the lid. This is when the joy of creativity begins!
- Apply a thin layer of transparent shimmer glue with the paint brush to the inside of the walls of the glass jar. Don't apply it too thick or it might not dry clear. A little bit goes along way! If you are impatient, you could use a hair dryer on a low heat to speed up the drying process.
- Place the pressed flowers facing outwards, into the shimmer glue and arrange them wherever you desire.
- Glue a thin layer of moss inside the bottom of the glass jar and glue the mini tree stump into the moss on one side of the jar.
- Glue the fairy silhouette to the front or on- top of the mini tree stump.
- Place the tea light on top of the layer of moss on the opposite side of the tree stump.
- Glue a couple of pearls into the moss at the bottom of the jar, as well as any of the remaining craft supplies. Sprinkle some of the dried lavender and rose petals around on the bottom of the jar to create a beautiful layer of enchantment. Be sure to gently tug to remove any glue strings.
- Gently turn on the tea light and enjoy your magical lantern!
Please note: You can easily switch out some of the non-mandatory supplies listed above, for other pretty things if you feel inspired. I recommend choosing colors that march your current home decor so that it can be enjoyed all year round.
About the Creator
Nicole (Nikki) M.
I'm a free-spirit, deep thinker and continuous learner. My hope is that my stories will evoke emotion, educate and inspire. Thank you for being apart of my creative journey!
Enjoyed the story? Support the Creator.
Subscribe for free to receive all their stories in your feed. You could also pledge your support or give them a one-off tip, letting them know you appreciate their work.
Keep reading
More stories from Nicole (Nikki) M. and writers in Lifehack and other communities.
The Ultimate Guide to Overcoming a Creative Block
Creativity is truly a special gift, and it is something that each and every one of us possesses. Some of us are more naturally inclined than others. This is due to a variety of factors, which include but are not limited to the following: genetics, self-confidence, experiences, social influences and more.
By Nicole (Nikki) M.2 years ago in Psyche
Create Your Balanced Diet Meal Plan
Create Your Balanced Diet Meal Plan Ever wondered why some people seem to have endless energy and a glowing complexion? Spoiler alert: it’s not just good genes. A balanced diet is the secret sauce. Imagine fueling your body like a high-performance car – you wouldn’t pour soda into the gas tank, right? So why feed your body anything less than premium nutrition? Let’s dive into how you can create a balanced diet meal plan that’s not just healthy but also delicious.
By Sweety Akter7 days ago in Lifehack
Digilibraries
I'll never beat The Art of War. But let me explain why. About a month ago, I received an invitation from DigiLibraries to post my books there. Obviously, they post free ebooks. I have several ebooks I have authored and I post them for people to download for free, even though I retain the copyright. It's free for the reader, but that doesn't mean people can use my writing without my permission.
By Stephanie Van Orman3 days ago in Writers


Comments
There are no comments for this story
Be the first to respond and start the conversation.