
Post-Processing in Photography
Transforming Your Photos from Ordinary to Extraordinary

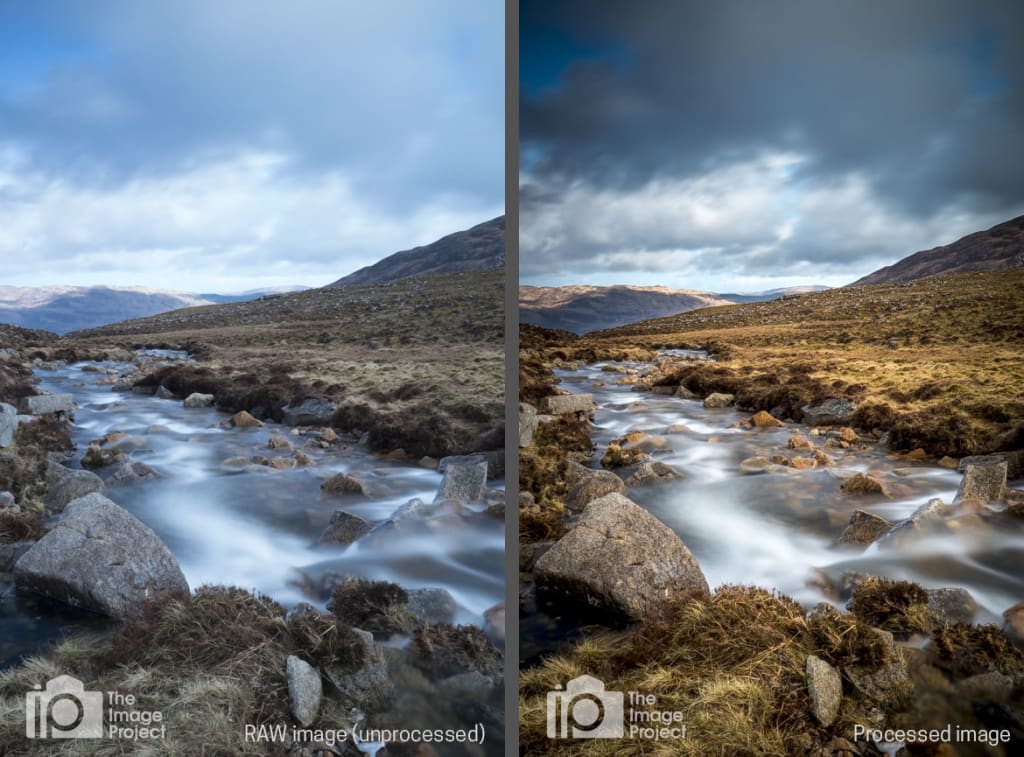
The Importance of Post-Processing
Post-processing is essential for several reasons:
1. Correcting Errors: Even the best photographers make mistakes. Post-processing can fix issues like exposure, color balance, and sharpness that might not have been perfect at the moment of capture.
2. Enhancing Aesthetics: Through post-processing, photographers can enhance the visual appeal of their images. This includes adjusting contrast, saturation, and clarity to make the photo more vibrant and engaging.
3. Creative Expression: Post-processing allows photographers to infuse their unique style and vision into their work. Techniques like selective coloring, black and white conversion, and adding filters can transform a mundane shot into a work of art.
4. Highlighting Details: Tools in post-processing software can bring out fine details that might be lost in the original image, adding depth and texture.
5. Consistency: For professionals, maintaining a consistent look across a portfolio or a series of images is crucial. Post-processing helps in achieving a cohesive aesthetic, which is important for branding and professional presentation.
The Process of Post-Processing
Post-processing typically involves several stages:
1. Importing and Organizing: The first step is to import photos into the chosen software and organize them. This helps in managing large numbers of files and keeping track of edits.
2. Basic Adjustments: This stage includes fundamental edits like cropping, straightening, and adjusting exposure, contrast, and white balance.
3. Detail Enhancement: Photographers may enhance details by sharpening the image, adjusting clarity, and reducing noise.
4. Color Correction: Adjusting colors is crucial for achieving the desired mood. This can involve tweaking the hue, saturation, and luminance of different colors.
5. Local Adjustments: These are selective edits applied to specific areas of the photo. Tools like adjustment brushes and radial filters allow for precise control.
6. Artistic Effects: Adding creative effects such as vignettes, split toning, and filters can significantly change the look and feel of a photo.
7. Final Touches and Exporting: The last steps include final adjustments, watermarking, and exporting the image in the required format and resolution.
Best Software for Photo Editing
In the digital age, post-processing has become an integral part of photography. Choosing the right software can significantly impact your workflow and the quality of your images. Here are some of the best options available:
Adobe Photoshop: The industry standard, Photoshop offers unparalleled editing capabilities. It's perfect for detailed retouching, advanced manipulations, and creating composites. With features like layers, masks, and an extensive set of tools, Photoshop allows photographers to achieve precise control over their images.
Adobe Lightroom: While Photoshop excels in detailed editing, Lightroom is designed for photo management and global adjustments. It’s ideal for batch processing and organizing large photo libraries. Lightroom’s non-destructive editing means your original files remain untouched, and its intuitive interface makes it accessible for both beginners and professionals.
Capture One: Preferred by many professional photographers, Capture One offers advanced color grading and tethered shooting capabilities. Its powerful RAW processing engine delivers exceptional image quality, making it a great choice for high-end commercial work.
Affinity Photo: A cost-effective alternative to Photoshop, Affinity Photo provides a robust set of tools for a one-time purchase. It supports PSD files and offers a comprehensive suite of editing features, including advanced retouching, batch processing, and digital painting.
Luminar: Known for its AI-driven editing tools, Luminar simplifies complex adjustments, making it perfect for beginners and those looking for quick edits. Its unique filters and user-friendly interface make it a popular choice for enhancing photos without a steep learning curve.
Step-by-Step Guide to Editing Landscape Photos
Editing landscape photos can bring out the best in your images, highlighting the beauty and drama of natural scenes. Here’s a step-by-step guide to get you started:
1. Start with a RAW File: Always shoot in RAW format to retain maximum detail and flexibility in post-processing. RAW files capture more data than JPEGs, allowing for better adjustments.
2. Import and Organize: Use software like Lightroom to import and organize your photos. Create a system of folders and keywords to keep your library manageable.
3. Basic Adjustments: Begin with basic adjustments like exposure, contrast, and white balance. Correct any underexposure or overexposure issues to ensure a balanced histogram.
4. Crop and Straighten: Crop your image to improve composition and remove any distracting elements. Use the straighten tool to correct any tilted horizons.
5. Enhance Details: Increase clarity and sharpness to bring out textures in your landscape. Be cautious not to overdo it, as excessive sharpening can introduce noise.
6. Adjust Colors: Use the HSL (Hue, Saturation, Luminance) sliders to enhance specific colors. For landscapes, adjusting the greens and blues can make a significant difference. Consider using a graduated filter to enhance the sky separately from the foreground.
7. Apply Local Adjustments: Use tools like the adjustment brush or radial filter to make localized edits. This allows you to selectively enhance areas like the sky, water, or foliage.
8. Correct Lens Distortions: Enable lens corrections to fix any distortion, vignetting, or chromatic aberration caused by your lens.
9. Noise Reduction: Apply noise reduction to reduce any graininess, especially in photos taken at high ISO settings. Balance it with sharpening to maintain image detail.
10. Final Touches: Add finishing touches such as a slight vignette to draw attention to the center of the image. You can also enhance the mood with split toning, adding warmth to the highlights and cool tones to the shadows.
11. Export: Export your edited image in the desired format and resolution. For web use, JPEG is common, while for prints, consider using TIFF for higher quality.
Using Lightroom Presets Effectively
Lightroom presets are a powerful tool for speeding up your workflow and maintaining a consistent style. Here’s how to use them effectively:
1. Choose Quality Presets: Invest in high-quality presets designed by reputable photographers. Free presets can be useful, but professional ones often provide better results and more subtle adjustments.
2. Understand the Preset: Apply the preset to a sample photo and examine what adjustments it makes. This helps you understand how each preset affects your images and allows for better customization.
3. Customize Presets: Presets are not one-size-fits-all. Adjust the preset settings to suit the specific photo you’re working on. Tweak exposure, contrast, and other settings to perfect the look.
4. Organize Presets: Keep your presets organized in folders by style or purpose. This makes it easier to find the right preset for each photo.
5. Use Presets as a Starting Point: Think of presets as a foundation. Apply them to get a base look, then refine the edit with additional adjustments. This approach ensures your photos retain a unique touch rather than looking like carbon copies of others.
6. Batch Editing: One of Lightroom’s strengths is batch processing. Apply presets to multiple photos at once, then make individual adjustments as needed. This is particularly useful for maintaining consistency across a series of images, such as a wedding or event.
By leveraging the right software, mastering landscape photo editing, and using Lightroom presets effectively, you can elevate your photography and create stunning, professional-quality images.
About the Creator
Enjoyed the story? Support the Creator.
Subscribe for free to receive all their stories in your feed.
Keep reading
More stories from COS and writers in Photography and other communities.
The Magic of a Big Mound of Dirt
My stomach is tight. I haven't done this in a while. I light my first joint and fiddle with my camera even though it's already set up the way I like it. I ask the model about her day. The model is a friend of a friend. Her skin glows. She walks with a sense of coiled and casual power. She both does and doesn't know how beautiful she is. Her hair falls in soft curls. The white, linen dress she chose for our photoshoot tangles with her ankles in the wind. We slow down and scope out our first location: a tree next to the old Hooters of our hometown downtown.
By sleepy drafts19 days ago in Photography
The Ultimate Camera Guide to DSLR Settings for Beginners
You’ve just bought yourself a shiny new DSLR camera, and you’re ready to start shooting in stunning detail. Except there’s only one problem – you just turned that sucker on, and now you’re staring at a bunch of buttons and dials with even more esoteric-sounding settings than the ones on your computer. Where do you start?
By Lily Madison3 days ago in Photography
The River's Due
The river in our village was everything. Giver of life, bringer of death. It provided you with good fortune or stole your future. It was where the priests baptized us and the grandmothers blessed us afterward, in between the washing. The river’s spirit whispered to us all, every day of our lives. When someone was lost to the river, those same traveling priests claimed God had called them home. We nodded to make them feel better, but we knew it was the river that had come calling for its due. We may have come to accept Jesus as our savior, but had our doubts he would have tried to walk our river.
By Shaun Walters2 days ago in Fiction


Comments
There are no comments for this story
Be the first to respond and start the conversation.