
Learning Magic One Frame at a Time
How creating content for social media rekindled my love for stop motion animation.

The Beginning
Growing up in the 90s, I'd often hear adults talk about all the harmful consequences of television. They argued that apart from exposing kids to obscene content, tv also caused all sorts of adverse psychological effects on young minds.
But now that I'm an adult, I can say that tv was surprisingly instrumental in my development. Sure, it exposed me to ceaselessly offensive shows such as Beavis and Butthead. But it also introduced me to incredibly informative tv programs such as SPLAT!
SPLAT! was a Canadian television show that taught kids everything about animation and featured some of the most talented artists in the industry. After watching a stop motion tutorial on one of their episodes, I became obsessed with the animation process and wanted to try it myself.
For my birthday, I asked my mom to buy me a camera to film movies with my toy soldiers. Unfortunately, I didn't get the sleek Canon EOS Rebel (the 35mm film version!) I wanted, so I didn't get to create movies with my toys either.
The Comeback
In college, I mostly gave up my aspirations to become an animator. Instead, I aggressively pursued other passions, such as photography and writing, because I thought those two skills gave me better chances at succeeding. Little did I know that years later, stop motion would return to my life in a big way.
When my wife and I started our product photography business in 2019, we received plenty of requests from different brands to create GIFs.
Technically, a GIF refers to the file format that lets you view moving images without using a dedicated media player. They used to inundate websites in the 90s (remember the glittery cursors and the infamous dancing baby?). But in recent years, the term has also become synonymous with short stop motion clips often featured on social media.
Since our business specialized in creating social media content, we started creating simple loops for brands, including these disappearing eyeglasses:
and these animated floating bath bombs:
Although the short clips you just saw were relatively simple to do, the process of creating them revived my interest in stop motion. Watching them made me feel nostalgic, and after a while, I started craving more challenging animations that looked, sounded, and felt like the movies I loved as a kid (i.e., The Nightmare Before Christmas, Chicken Run, James & The Giant Peach, etc.).
In January 2021, I bought The Aardman Book of Filmmaking and started reading about the traditional art of stop motion. Sadly, I didn't get to try the techniques I learned right away because I was too busy managing our business.
Inevitably, I started feeling burnt out after working non-stop for several months. I wanted to do something that would bring back some creativity in my life, so in April 2021, I finally decided to try all the stop motion tricks I read in the book.
For my first project, I put on tiny shoes on my fingers and created the kickflip animation below.
I enjoyed the process of creating stop motion so much that the next week, I made another animation of an orange fruit turning into an orange juice:
Since I do photography for a living, lighting and composing my mini-movies were relatively easy for me. In fact, I was pleasantly surprised that my first animations already appeared cinematic despite my lack of experience in lighting stop motion animation sets.
The real challenge was how to make the movements of my "characters" appear realistic. It took a lot of trial and error to achieve the illusion of movement. I wanted to avoid the jerky movements common in amateur animations, so I had to meticulously shoot scenes several times until everything looked relatively smooth.
The Animating Process
So how does stop-motion work? It certainly feels like magic to make inanimate objects appear to move, but the concept behind it is deceptively simple.
Let me show you how it works using this animated hamburger clip I created a few weeks ago.
My intention was to make the burger appear as if it was sticking out its tongue and licking its "lips." To animate the movement, I first had to take a photo of the burger in its normal position.
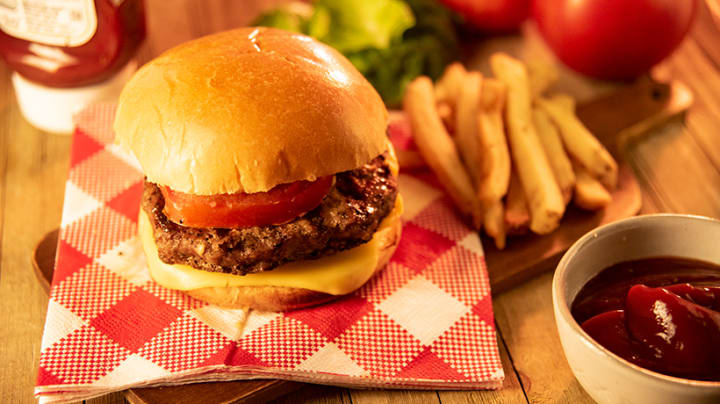
I then moved the tomato slice a little bit using tweezers and took another photo.
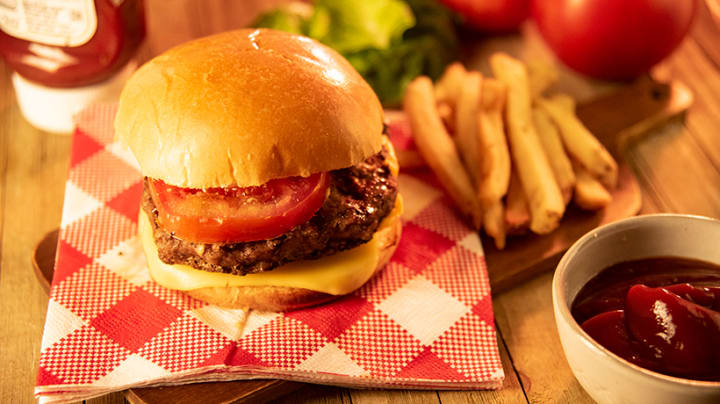
I repeated the process until I finished capturing the entire movement.
Once I had all the images together, I loaded them sequentially into my editing software. I sped up the sequence until the motion appeared smooth and natural.
Now here's the rest of the "veggie burger" video with a few behind-the-scenes clips to show you how I did it. The actual animation spans about 4 seconds but creating it took me half a day.
The New Project
To better understand how I make stop motion, I'll share the process I used in creating my most recent short animation.
The goal for my new project was to create a diorama with animated plastic insects. To begin, I gathered all the things I needed for the project.
First, I bought a variety of artificial plants for my diorama, as well as moss and grass.
Then, I bought a bag of plastic insects to populate the set. I decided to choose spiders, a beetle, and a dragonfly as my main characters.
I also collected a few tools I needed to build the diorama. I got a pair of scissors and a craft knife to cut paper and cardboard, as well as a pruner to snip the artificial plants.
And finally, I got a variety of adhesive tools, from hot glue to tape, for binding things together.
Building The Set
Building a set involves creative thinking because the scene needs to look believable (or at least familiar) enough to the audience.
I wanted my set to be a table next to windows with a beautiful sky in the backdrop. For that, all I had to do was take a poster board with clouds printed on it and tape it to the wall.
I then got a pair of decorative window frames from the craft store and used those as my windows.
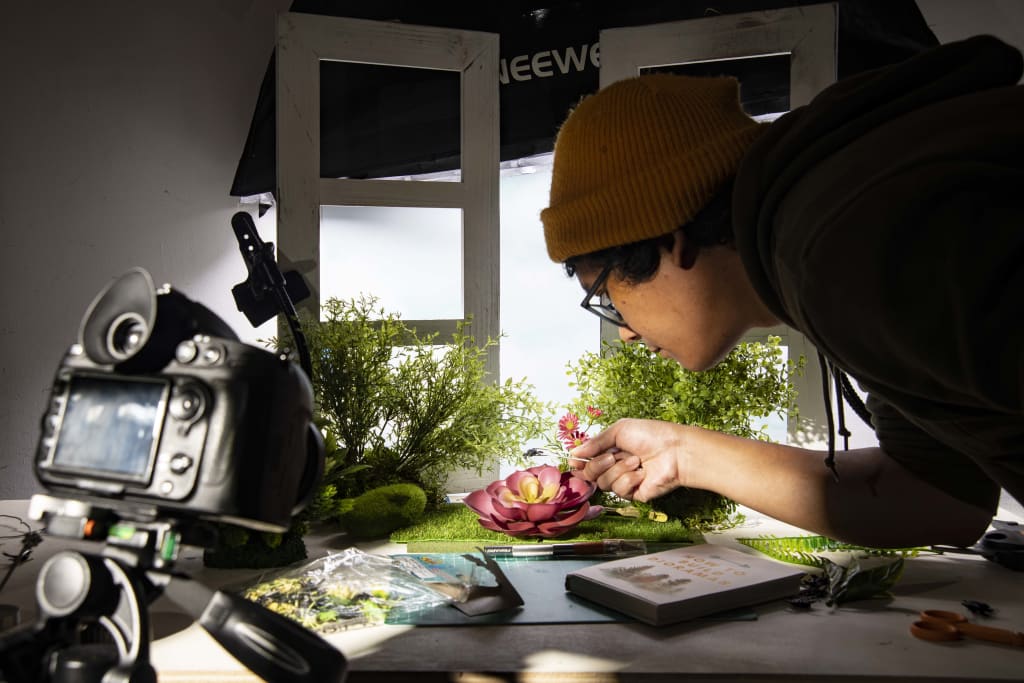
After installing the frames, I began to build my forest diorama. I taped the fake grass to the table and added the artificial plants around it. I used the pruner to trim the stems. I then inserted some plastic foliage into foam balls and covered them with moss.
I included a small cutting mat then placed a pair of scissors and a craft knife on the table to serve as visual clues for the audience. I also added a book that says "How to Build Dioramas." To make it, I printed out a cover I designed, cut it to size with scissors, and pasted it on top of an actual book.
Finally, I placed a plastic bag filled with toy insects next to the book. It was where the "characters" would first appear, so it was essential in the scene.
Even though I arranged the props myself, I made sure that the set didn't look "staged." That way, when people watch the clip, they'd feel that somebody has been using all those tools to create an actual diorama.
Animating The Characters
People typically associate stop motion animation with clay puppets. But since I'm not good at sculpting, I often work with items available at home.
Unfortunately, animating ordinary objects can be pretty challenging. Unlike clay, most items typically don't have many moving parts, so posing them can be problematic. And that's exactly the issue I faced with the plastic insects.
To animate the spiders, I shifted their bodies back and forth as I moved them forward to create the illusion that their legs were moving. It was that simple.
But it was an entirely different story for the beetle.
Since I couldn't independently move the legs of the beetle character, I had to cut the sides of three separate toy beetles and pasted them back onto the bodies in slightly different positions.
The first beetle had the legs on the left side slightly higher than the right side. The second one had the legs on both sides parallel to each other. And finally, the third one had the legs on the right side higher than the left side.
To animate the beetle, I had to replace one beetle with another after each frame. That way, the legs would appear to be moving once I play the sequence.
The next challenge was to figure out how to make the dragonfly's wings flutter.
Animating the dragonfly required a stop motion rig which you see below. It's just like a helping hand commonly used by watchmakers to support small items.
Like the beetle, I also had to use three dragonflies to create the illusion of movement. For the first one, I kept the dragonfly wings in a resting position. For the second, I glued the wings together so they were facing upwards. And for the third, I glued them so they were facing downwards.
The final step was to glue each dragonfly to an aluminum wire and attach it to the stop motion rig. After shooting a frame, I replaced the dragonfly with the one with its wings up. Then, I swapped it with the one that had its wings down. Doing so created the illusion that the insect's wings were flapping.
Filming the Scenes
After figuring out how to animate the "characters," I then transferred them to the set to start filming.
Since I couldn't freely move the legs of my characters, I had to keep changing the insects I used in each frame. That's why it took me about ten hours to animate everything (including reshoots), even though the entire video lasted less than 20 seconds.
After a few more hours of editing the animated clips together, I ended up with the result you see below!
I've only been doing real stop motion clips for a short time, and I still have a lot to learn. But I have to say that it's definitely quite empowering to have the ability to turn something imaginary into something tangible.
Doing creative activities such as animation changes how one perceives the world. Ever since I started my hobby, I've been looking at every object with a child's curiosity. It's quite absurd to think that I still play with things even though I'm already in my thirties. But it feels good to celebrate the child in me once again through stop motion.
I dream that someday some kid would stumble upon my stop motion clips as I did with Splat and be inspired to create their own movies. That way, they won't ever forget the magic they possess even as they become grownups themselves.
About the Creator
Chad Verzosa
I write and take photos.
Enjoyed the story? Support the Creator.
Subscribe for free to receive all their stories in your feed. You could also pledge your support or give them a one-off tip, letting them know you appreciate their work.
Reader insights
Outstanding
Excellent work. Looking forward to reading more!
Top insights
Compelling and original writing
Creative use of language & vocab
Easy to read and follow
Well-structured & engaging content
Keep reading
More stories from Chad Verzosa and writers in Photography and other communities.
Want to Make Objects Float in Your Photos? Here's What You Need to Do!. First Place in Before and After Challenge.
Many photographers shy away from taking photos of floating objects because they think it's too challenging--especially if they don't consider themselves Photoshop wizards. But the truth is that the concept behind "levitation" photography is quite simple and requires minimal editing skills.
By Chad Verzosa3 years ago in Photography
Chasing Dreams: Capturing Life's Precious Moments
It was the summer of 2024 when I finally decided to chase my dream. I’ve always been fascinated by the vastness of the ocean and the secrets it hides beneath the surface. As my 30th birthday approached, I realized it was time to fully embrace my love for marine life and underwater photography. Little did I know, a tiny gadget was about to change my life forever.
By Hongyu Pang8 days ago in Photography
The Three Essential Lenses for Landscape Astrophotography
For landscape astrophotography enthusiasts, capturing the night sky's grandeur requires a well-thought-out selection of lenses. While there are many options on the market, having a minimalist setup that delivers top-notch image quality is crucial for both efficiency and ease of travel. Based on extensive experience and practical use, the following three lenses form the "holy trinity" of landscape astrophotography: a 14mm f/1.8, a 24mm f/1.4, and a 50mm f/1.4. These lenses offer the versatility and quality needed to excel in various astrophotography scenarios.
By Dave Karpinsky, PhD, MBA6 days ago in Photography


Comments
There are no comments for this story
Be the first to respond and start the conversation.