
7 yoga poses to help relieve joint pain as the North continues to get cold
The constantly changing weather makes joint pain more uncomfortable. Yoga has long been considered an effective pain relief method, including yoga for joint pain.

According to Prevention, one study found that yoga was effective in increasing muscle strength, flexibility and mobility in people with knee arthritis as well as improving grip strength-related performance in people with knee arthritis. rheumatoid arthritis. It is important that you choose yoga exercises to reduce joint pain that are suitable for your condition.
1. How does yoga help relieve joint pain?
Pain is perhaps the biggest reason people with arthritis seek yoga. Physically, strengthening the supporting muscles around a joint can increase stability, which can minimize irritation within the joint. Or there may be nerve pain related to degeneration - perhaps the spine pressing on a nerve, leading to sciatica - and yoga can help alleviate this.
Some methods in yoga also have an impact on our nervous system. For example, research shows that deep breathing during yoga helps us move out of the stress response (something people with chronic pain frequently experience) and into a relaxation mechanism, which can help reduce stress. painful...
2. Yoga poses help reduce joint pain
In addition to physical activities such as walking, cycling, and swimming, people with joint pain can practice some of the yoga exercises below to effectively relieve pain. Note, no matter what type of exercise you do, according to the CDC, people with arthritis should do moderate physical activity, about 150 minutes per week. However, you should not practice without warming up thoroughly; Avoid doing exercises with jumping movements that increase pressure on joints such as high-intensity cardio, jumping rope or squats...
2.1. Child's Pose (Balasana)
Effects: Soothe arthritis pain in the cold season by improving blood circulation, reducing joint stiffness and increasing flexibility in inflamed joints as well as reducing pain. Child's pose focuses on the neck joints, lower back, and hip flexors . You can place the cushion on your forehead, hips or thighs to feel more comfortable when practicing this yoga pose.
To perform Baby Pose (Balasana) safely and effectively for people with joint pain, follow these steps:
- Starting from a kneeling position, sit on your heels with your knees bent and butt on your heels.
- Make sure your knees are as wide as your hips to allow space for your abdomen, especially if you have tightness in your hips or hip joint pain.
- While exhaling, slowly lean forward so that your spine is fully extended. Place your hands alongside your body with your palms facing up, or you can extend your arms in front of the top of your head to further lengthen your spine, if this doesn't cause pain or discomfort in your shoulders and neck.
- Breathe deeply and hold this position for 30 seconds to several minutes, depending on your comfort.
To come out of the pose, use your hands to support your body, slowly lift your upper body and return to a sitting position on your heels.
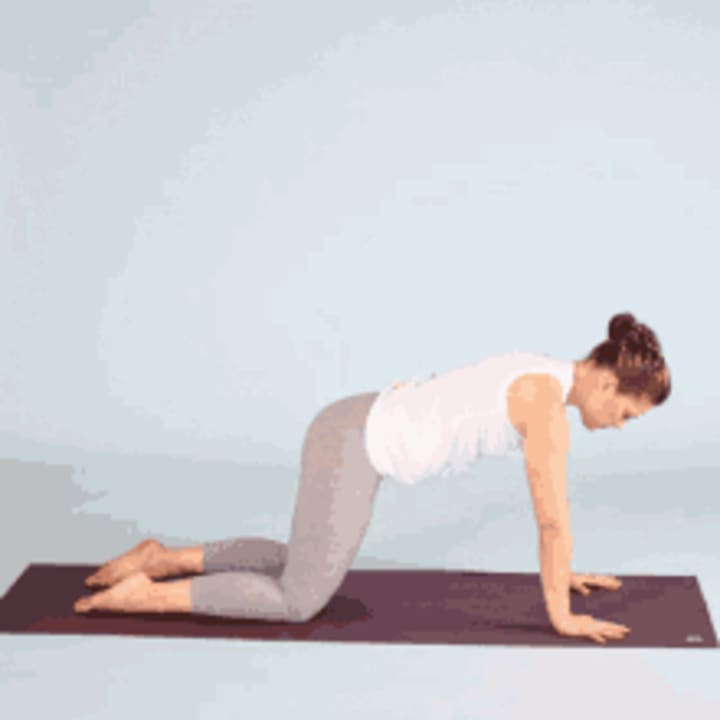
2.2. Downward facing dog pose
Effects : Downward-facing dog pose helps increase range of motion in the shoulders, wrists, hips and ankles, thereby promoting joint flexibility in these areas. This position also helps increase blood circulation, providing more oxygen and nutrients to painful joints, contributing to overall joint health.

To perform Downward Facing Dog Pose (Adho Mukha Svanasana) safely and effectively for people with joint pain, follow these instructions:
- Start in an all-fours position (table position) with your hands and knees so that your hands are shoulder-width apart and your knees are hip-width apart. Toes curled and fingers spread to stabilize the body.
- Then, use force to press your hands into the floor while lifting your knees with your hips pushing up toward the ceiling to feel your spine lengthening and stretching. Note, the head - neck - spine must always lie in a straight line.
- Take a deep breath when your legs and back are in the highest position.
- Hold this position for 1 - 3 minutes if you feel comfortable.
2.3. Cat-cow pose
Effects: The cat-cow pose helps reduce stiffness related to arthritis as well as strengthen the spine and improve blood circulation in the back discs, suitable for people with pain from sitting. much.
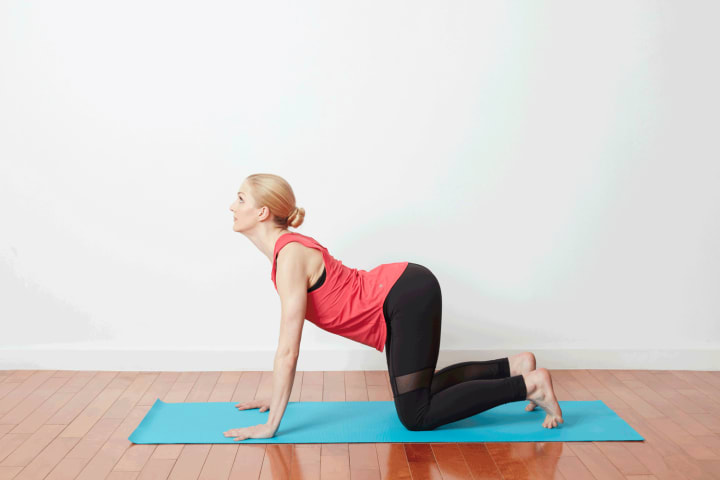
How to practice cat-cow pose as follows:
- Start in an all-fours position (table position) with your hands and knees. Keep your arms perpendicular to the floor so that your hands are shoulder-width apart and your knees are hip-width apart.
- Eyes facing forward, take a deep breath and then slowly lower your belly, your buttocks slightly rising while your chest is pushed up (cow pose).
- Exhale slowly, slowly pull the tailbone down and curl up deeply with the head bent towards the chest while tightening the abdomen (cat pose).
- Repeat these two positions for 1 - 3 minutes if you feel your joints are not stressed.
2.4. Warrior pose
Effects: Warrior pose focuses on improving flexibility in the hip, knee and shoulder joints.
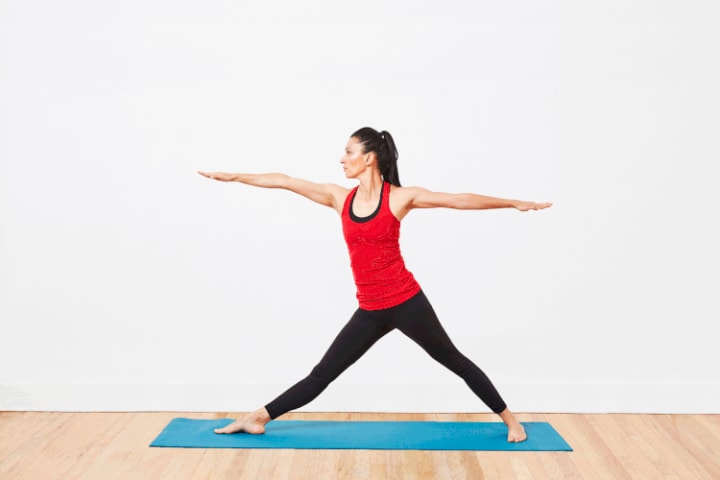
How to do warrior pose yoga:
- Starting from Tadasana standing position, step your right foot back about one meter, depending on your height. The left leg stays in front and the left knee is slightly bent.
- Point your right foot back about 45 degrees and keep your right heel parallel to your left heel.
- Take a deep breath, lift your arms above your head, palms facing each other, keeping your back straight.
- When exhaling, bend your left knee so that it forms a right angle. Make sure the left knee does not exceed the foot.
- Keep your back straight, look forward. Try to hold this position for a few deep breaths.
- To leave the pose, take a deep breath and stand up straight. Repeat the pose with the opposite leg.
2.5. Bridge pose
Effects: Bridge pose improves flexibility in the spine, hips and knees as well as promoting better joint mobility, thereby providing pain relief benefits for people with joint pain.
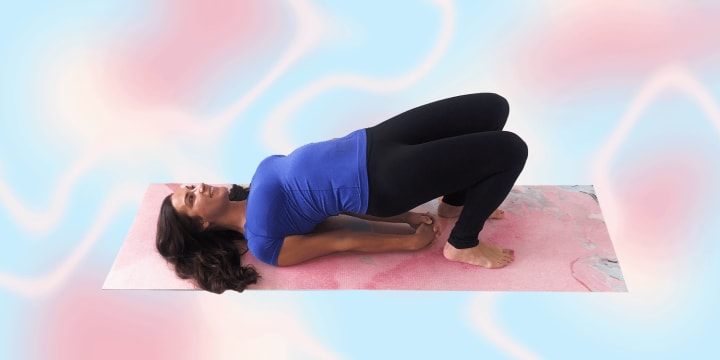
To do bridge yoga pose, also known as Setu Bandhasana, you can follow these steps:
- Lie on your back on the floor, place your hands on the floor parallel to your body, bend your knees so that the soles of your feet touch the floor.
- Tighten your glutes and abs before pushing yourself up. Form a straight line from knee to shoulder.
- Tighten your core muscles and breathe deeply.
- Hold for 20 - 30 seconds, then lower yourself to the starting position. Repeat the movement about 10 times.
- To leave the pose, exhale and slowly lower your hips to the floor, release your hands and roll your back down one knuckle at a time.
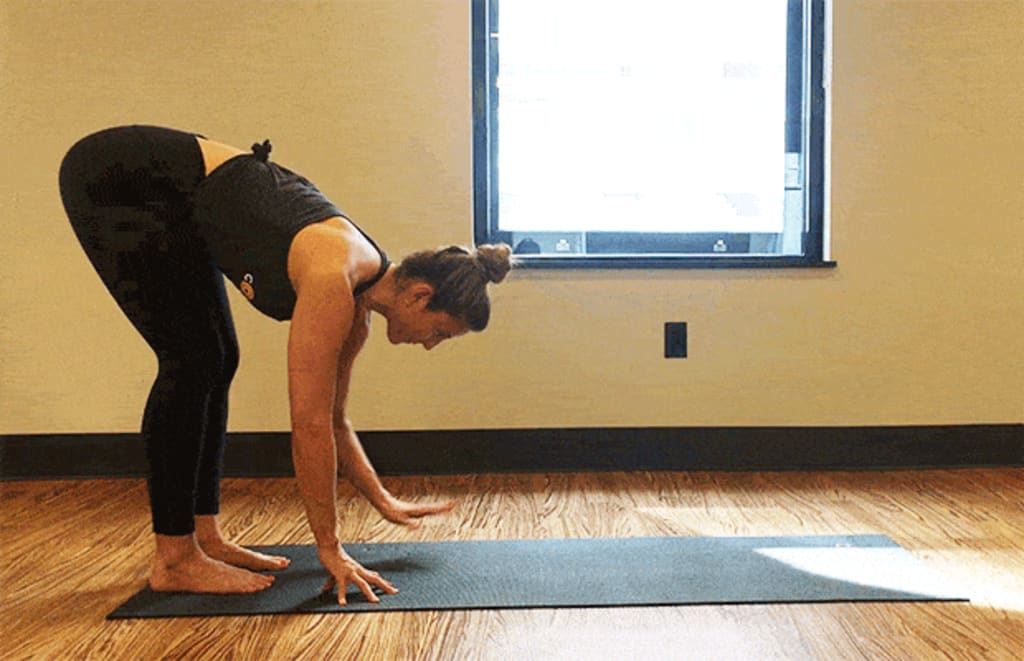
2.6. Sitting position bent forward or sitting forward
Effects: The bent-over sitting position promotes joint flexibility, especially stiff joints in the spine.
About the Creator
Ken Daklak
Telling stories my heart needs to tell <3 life is a journey, not a competition
If you like what you read, feel free to leave a tip,I would love some feedback
https://s.shopee.vn/pa9mXcwE?share_channel_code=8
Enjoyed the story? Support the Creator.
Subscribe for free to receive all their stories in your feed. You could also pledge your support or give them a one-off tip, letting them know you appreciate their work.
Keep reading
More stories from Ken Daklak and writers in Longevity and other communities.
Things to know to avoid injury when practicing Yoga
Ms. Le Thi Yen (40 years old, in Phu Tho) practices Yoga at home through an online course. Even though she was instructed to warm up before starting the exercise, she was subjective and skipped the warm up exercise. After 5 days of training, she sprained her ankle and had pain in her knee every time she exercised. When she went to the doctor, the doctor said that in addition to the sprain, she also had a stretched ligament.
By Ken Daklak25 days ago in Longevity


Comments
There are no comments for this story
Be the first to respond and start the conversation.