
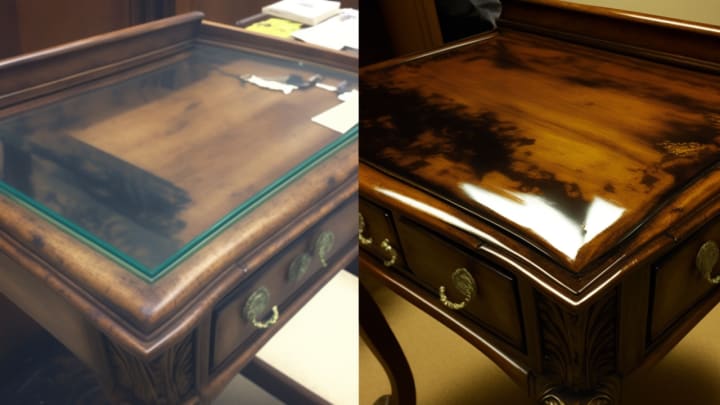
Furniture Restoration
Beginner quick start overview

Test created with the aid of ChatGPT (https://openai.com).
Preparation:
Before starting the refinishing process, it's important to properly prepare the furniture to ensure a smooth and long-lasting finish.
Choose the right piece of furniture: First, consider the condition of the furniture and whether it's worth refinishing. Look for a piece that's structurally sound and in good condition, without major damage or rot. Additionally, consider the style and design of the furniture, and whether it fits your personal taste and decor.
Clean the furniture: Start by removing any dust or debris from the furniture. Use a soft cloth and a mild detergent solution to gently wipe down the entire surface, including corners, crevices, and details. Be sure to remove any old wax, dirt, or grime that may be present.
Sand the furniture: Next, use a fine-grit sandpaper to smooth out any rough surfaces, remove any existing finish, and prepare the surface for the new finish. Sand in the direction of the grain, and be sure to sand all surfaces, including the legs, arms, and any other hard-to-reach areas.
Fill in any imperfections: After sanding, inspect the furniture for any cracks, dents, or scratches. Use a wood filler to fill in any gaps or imperfections. Follow the manufacturer's instructions for application and drying times, and be sure to sand down the filler until it's smooth and flush with the surface.
Sand the furniture again: After filling in any imperfections, use a medium-grit sandpaper to sand the entire surface once again. This will help ensure that the surface is smooth and even, and that the new finish will adhere properly. Be sure to wipe down the surface with a clean, dry cloth to remove any dust or debris before proceeding.
By following these preparation steps, you'll be able to create a solid foundation for your new finish, and ensure that it will look beautiful and last for years to come.
Choosing the Right Finish:
Choosing the right finish is crucial to achieving the desired look and protecting the furniture from wear and tear. There are various types of finishes to choose from, such as paint, stain, or a combination of both.
a. Paint:
Paint is an excellent choice if you want to completely change the color or style of your furniture. There are many types of paints available for furniture, including chalk paint, milk paint, and latex paint. Chalk paint and milk paint have a matte finish and can be easily distressed for a vintage or shabby chic look. Latex paint comes in a range of colors and finishes, such as satin, semi-gloss, and high-gloss.
When choosing a paint, consider the following:
Type of paint: As mentioned above, there are different types of paint available for furniture. Choose a paint that suits your desired look and level of durability.
Color: Select a color that complements your decor and the style of the furniture.
Finish: Choose a finish that works well with the furniture's style and purpose. A matte finish can give an antique look, while a glossy finish can give a modern touch.
b. Stain:
Stain is an excellent choice if you want to enhance the natural beauty of the wood grain and achieve a warm and natural look. Stain comes in various colors and opacities, from light to dark, and can be used on its own or in combination with paint.
When choosing a stain, consider the following:
Type of stain: There are two main types of stain - oil-based and water-based. Oil-based stains penetrate deeply into the wood and offer a more traditional look, while water-based stains are more environmentally friendly and dry quickly.
Color: Choose a color that complements the existing wood tone or matches the desired style.
Opacity: Decide how opaque you want the stain to be. Lighter stains are more transparent, allowing the natural grain to show through, while darker stains are more opaque and can cover up imperfections.
c. Combination of paint and stain:
Using a combination of paint and stain is an excellent choice if you want to add dimension and depth to your furniture. You can use paint and stain in various ways, such as painting the base and staining the top, or vice versa.
When using a combination of paint and stain, consider the following:
Color: Choose colors that complement each other and achieve the desired look.
Placement: Decide which parts of the furniture you want to paint and which parts you want to stain.
Application order: Apply the stain first and let it dry completely before painting. This will help the paint adhere better to the wood.
By considering these factors, you can choose the right finish for your furniture refinishing project and achieve the desired look.
Applying the Finish:
If you're going to paint the furniture, start by applying a thin, even coat of paint using a brush or roller. Be sure to use long, smooth strokes in the direction of the grain for a seamless finish. Avoid overloading the brush or roller with too much paint as this can cause drips and an uneven coat.
Allow the first coat to dry for at least 24 hours before applying a second coat. Check the manufacturer's instructions on the paint can for specific drying times.
If you're applying a second coat, lightly sand the surface with a fine-grit sandpaper to remove any bumps or imperfections that may have occurred during the first coat. This will also help the second coat adhere better to the surface.
Apply the second coat of paint using the same technique as the first coat. Again, let it dry for at least 24 hours before using the furniture.
If you're going to use a stain, it's important to wear gloves and a respirator mask to protect your skin and lungs. Begin by stirring the stain thoroughly, then use a clean cloth or brush to apply the stain in the direction of the grain.
Work in small sections, applying the stain evenly and then wiping off any excess with a clean cloth. It's important to work quickly to avoid streaks and blotches.
Allow the stain to dry for several hours before deciding if you want to apply a second coat. Some stains may require a second coat for a deeper color.
If you choose to apply a second coat, repeat the process for the first coat, making sure to wipe off any excess stain and allow the furniture to dry completely before using it.
If you're using a combination of paint and stain, start by staining the wood first and letting it dry completely before applying the paint. Use a clean cloth or brush to apply the stain in the direction of the grain, and let it sit for a few minutes before wiping off any excess.
Once the stain is completely dry, apply the paint using the same technique as outlined above, applying a thin, even coat with a brush or roller. Let the paint dry for at least 24 hours before applying a second coat if desired.
Finishing Touches:
After applying the desired finish to your furniture, it's time to give it a polished and professional look with a few final touches.
Lightly sand the surface: Once the furniture is completely dry, use a fine-grit sandpaper to lightly sand the surface. This step is crucial to ensure a smooth and even finish, and it will also help to remove any brush strokes or imperfections in the surface. Be sure to follow the grain of the wood and sand gently to avoid damaging the surface.
Apply a Clear Coat: To protect the finish and give it a polished look, apply a clear coat of polyurethane or wax. Polyurethane provides a durable and long-lasting finish that is resistant to scratches, while wax gives a softer and more natural finish. When applying polyurethane, use a high-quality brush and apply in long, even strokes, following the direction of the grain. Let it dry completely before sanding lightly with fine-grit sandpaper and applying a second coat. For wax, apply a thin layer with a soft cloth and buff it out to a shine.
Reattach Hardware: Once the clear coat is dry, reattach any hardware or knobs that were removed during the refinishing process. Make sure they are attached securely and are level with the surface of the furniture.
Buff the Surface: Finally, buff the surface of the furniture with a soft cloth to remove any dust or debris and give it a final shine. Stand back and admire your handiwork!
By following these finishing steps, you can transform an old and worn piece of furniture into a beautiful and updated piece that will be a standout in any room. Remember, take your time and be patient, and your finished product will be well worth the effort!
About the Creator
Rodney Connor
Rodney Connor is a passionate writer from Quiet Dell, WV who loves to craft engaging content. Whether it's fiction, non-fiction, or poetry, Rodney pours his heart and soul into every word he writes.
Enjoyed the story? Support the Creator.
Subscribe for free to receive all their stories in your feed. You could also become a paid subscriber, letting them know you appreciate their work.
Reader insights
Keep reading
More stories from Rodney Connor and writers in Education and other communities.
Giants of the Road: Unveiling the Titan 63-Inch Tire
The Titan's Tale: Conquering the Road One Giant Leap at a Time In the realm of vehicular tires, there's a colossal king that towers above the rest, an undeniable force of endurance, reliability, and power. Let me take you on a journey, introducing you to the 'Titan', a monumental 63-inch tire from the pioneers at Titan International.
By Rodney Connorabout a year ago in Education
Top 50 Real Life Secret Societies
50 - The Cicada 3301 Secret Society Originally an entity that posted three sets of puzzles online between 2012 and 2014, the Cicada 3301 puzzles focused heavily on data security, cryptography, stenography, and internet anonymity.
By Vidello Productions3 days ago in Education
Best Time to Travel Rajasthan, India: A Complete Guide
Introduction Rajasthan, India’s largest state, is a land of deserts, palaces, and vibrant cultures. Known as the "Land of Kings," Rajasthan offers travelers a unique experience with its rich history, majestic forts, and royal heritage. But when is the best time to travel to Rajasthan, India? This guide provides insights to help you plan the perfect trip.
By Mannu Chuahana day ago in Education


Comments
There are no comments for this story
Be the first to respond and start the conversation.